Introduction
A sales funnel transforms strangers into customers through strategic page design and user experience—and Webflow provides unique advantages for building high-converting funnels without developer dependency.
The problem with traditional funnels: Most businesses build sales funnels across disconnected tools—WordPress for content, separate landing page builders, third-party checkout systems—creating friction, inconsistent branding, and slow page speeds that hemorrhage conversions at every stage.
The Webflow advantage: Unified platform for entire funnel, designer-friendly interface, exceptional performance, and visual control over every conversion element. Build awareness content, capture leads, present offers, and close deals—all within one fast-loading, brand-consistent ecosystem.
The opportunity: Converting 2% of visitors instead of 5% costs you 60% of potential revenue. Sales funnel optimization isn't optional—it's the difference between barely profitable and wildly successful campaigns. Small improvements at each funnel stage compound into dramatic revenue increases.
This comprehensive guide shows you how to build and optimize every stage of your sales funnel in Webflow—from awareness-driving blog content to high-converting checkout flows. Whether you're generating leads for services or selling products directly, you'll learn the strategies that turn Webflow's design capabilities into conversion engines.
Expected outcomes: Properly optimized Webflow funnels typically see 15-40% conversion rate improvements within 60-90 days of implementation.
Understanding Sales Funnel Stages in Webflow
Map your funnel stages to Webflow's capabilities for systematic optimization.
Awareness Stage: Attracting Visitors
Goal: Drive qualified traffic to your funnel through content and ads
Webflow implementation:
Blog and content hub:
- Webflow CMS for scalable blog publishing
- SEO-optimized articles targeting top-of-funnel keywords
- Fast-loading pages that rank well (90+ PageSpeed scores)
- Internal linking to move readers deeper into funnel
Landing pages:
- Campaign-specific pages for paid ads
- A/B testing integration for optimization
- Fast load times reduce bounce rates
- Mobile-responsive designs capture mobile traffic
Webflow advantage: No developer needed to publish content or launch landing pages—marketing teams maintain publishing velocity without technical bottlenecks.
Consideration Stage: Nurturing Interest
Goal: Convert visitors into leads by demonstrating value
Webflow implementation:
Product/service pages:
- Visual design showcases offerings professionally
- Interactions and animations highlight features
- Webflow CMS manages multiple product pages at scale
- Dynamic content personalizes experience
Lead magnets and gated content:
- Embeddable forms capture emails for whitepapers/guides
- Form submissions integrated with email marketing tools (Mailchimp, HubSpot)
- Thank-you pages with redirect logic
- CMS-powered resource libraries
Comparison pages:
- Tables comparing your solution to competitors
- Webflow's layout flexibility presents information clearly
- Testimonials and case studies build credibility
Decision Stage: Closing the Sale
Goal: Convert qualified leads into paying customers
Webflow implementation:
Pricing pages:
- Clean, scannable pricing tables
- Highlight recommended plans with visual emphasis
- Interactive calculators for custom pricing
- Clear CTAs with minimal friction
Demo request flows:
- Optimized multi-step forms
- Calendar integration (Calendly, etc.)
- Confirmation pages with next steps
- Automated email sequences triggered by form submission
Checkout (Webflow Ecommerce):
- Native checkout for digital/physical products
- Stripe integration for payments
- Mobile-optimized checkout flow
- Abandoned cart recovery via integrations
Retention Stage: Maximizing Customer Value
Goal: Reduce churn and increase lifetime value
Webflow implementation:
Customer portals:
- Members-only content areas
- Password-protected pages for resources
- Dashboard-style pages for account management
- Webflow's flexibility creates custom experiences
Upsell pages:
- Promote premium tiers or add-ons
- CMS-driven recommendation engines
- Cross-sell related products
Resource centers:
- Knowledge bases and documentation
- Tutorial content library
- Community forums (via integrations)
Webflow's strength: Every funnel stage lives in one ecosystem—consistent branding, unified analytics, single platform to manage vs. stitching together disparate tools.
Building High-Converting Landing Pages
Landing pages are funnel entry points—Webflow's performance and design capabilities maximize conversions.
Speed and Performance Optimization
Page speed directly impacts conversion rates—1-second delay = 7% conversion drop.
Webflow's automatic optimizations:
- Global CDN: Content served from servers nearest to visitors worldwide
- Image optimization: WebP conversion and lazy loading automatic
- Code minification: CSS/JavaScript automatically compressed
- Asset caching: Repeat visitors load pages instantly
Results: Webflow landing pages consistently score 90-100 on Google PageSpeed Insights without manual optimization—dramatically outperforming WordPress, Wix, or custom-coded alternatives.
Additional optimization:
- Compress images before upload (TinyPNG, ImageOptim)
- Limit external scripts (tracking, widgets)
- Leverage Webflow's lazy loading for below-fold content
- Use Webflow interactions sparingly (complex animations impact load time)
Mobile-First Design
60%+ of funnel traffic is mobile—broken mobile experience kills conversions.
Webflow's responsive design system:
- Breakpoint-based design: Optimize for desktop, tablet, and mobile simultaneously
- Touch-friendly elements: Buttons sized for finger taps (44×44px minimum)
- Mobile navigation: Custom mobile menus without code
- Form optimization: Appropriate keyboard types (email, phone, number)
Mobile conversion best practices:
- Simplify navigation (minimal distractions)
- Place CTA above fold on mobile
- Reduce form fields for mobile users (each field = 5-10% conversion loss)
- Test on real devices (iPhone, Android)
Clear Value Propositions
Visitors decide in 3-5 seconds whether to stay or bounce—clarity wins.
Headline best practices:
- Benefit-focused: "Save 10 hours/week" not "Automation software"
- Specific: "Trusted by 50,000 companies" not "Loved by thousands"
- Short: 8-10 words maximum for scannability
- Above fold: Visible without scrolling
Supporting elements:
- Subheadline expands on value (1-2 sentences)
- Visual reinforces benefit (hero image, product shot)
- Social proof near headline (customer logos, testimonial)
Webflow advantage: Typography controls, layout flexibility, and visual hierarchy tools make crafting clear value propositions intuitive—no fighting with template constraints.
Strong CTAs (Calls-to-Action)
CTA determines conversion—every design choice should guide visitors toward action.
CTA optimization in Webflow:
Text:
- Action-oriented verbs: "Start Free Trial" not "Submit"
- Benefit-focused: "Get My Free Guide" not "Download"
- Urgency elements: "Start Saving Today"
Design:
- Contrasting color: CTA button stands out from page palette
- Size: Large enough to be obvious (minimum 44×44px for touch)
- White space: Breathing room around button draws attention
- Position: Above fold, repeated on long pages
Multiple CTAs strategy:
- One primary CTA (bold, prominent)
- Optional secondary CTA (subtle, alternative action)
- Avoid competing CTAs (confuses visitors)
Webflow implementation: Style Library ensures CTA consistency across funnel; button components reusable throughout site.
Social Proof Placement
Trust signals reduce friction and increase conversions.
Types of social proof:
- Customer testimonials: Specific results with names/photos
- Trust badges: Payment security, certifications, awards
- Client logos: Recognized brands build credibility
- Usage stats: "Join 50,000+ users"
- Case studies: Detailed success stories
Strategic placement:
- Near CTA (validates conversion decision)
- Below value proposition (builds credibility early)
- Throughout long pages (reinforces trust)
- Checkout flow (reduces payment anxiety)
Webflow CMS for testimonials: Store testimonials in CMS collection; dynamically display on different pages; easy to update and maintain.
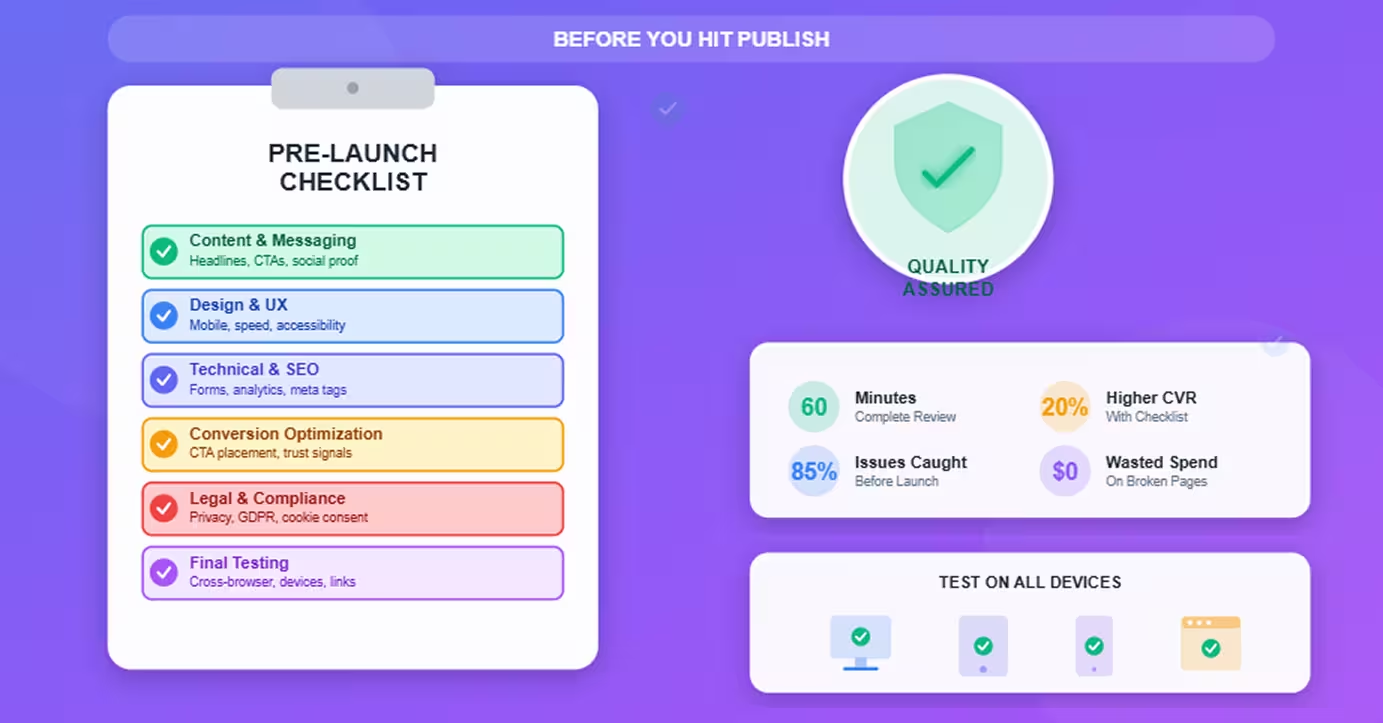
Form Optimization
Every form field is friction—minimize ruthlessly.
Field reduction strategy:
- Minimum viable: Name + email sufficient for top-funnel offers
- Progressive profiling: Collect more data over time, not all at once
- Optional fields: Mark clearly or remove entirely
- Smart defaults: Pre-fill based on IP (country, timezone)
Form best practices in Webflow:
- Logical ordering: Personal info → contact → preferences
- Clear labels: Descriptive field labels, no jargon
- Error handling: Inline validation with helpful messages
- Mobile keyboards: Appropriate input types (email triggers @ keyboard)
- Submit button: Benefit-focused text ("Get My Free Audit")
Form integrations:
- Mailchimp, HubSpot, Salesforce (native and Zapier)
- Email notifications to sales team
- Redirect to thank-you page with next steps
- Google Analytics event tracking
Streamlining the Consideration Phase
Move interested visitors toward decision by removing objections and building confidence.
Product Page Design
Product pages showcase value and address objections.
Essential elements:
Above fold:
- Product name and one-line value proposition
- Hero image or video demonstration
- Primary CTA ("Start Free Trial," "Schedule Demo")
- Trust indicator (customer count, rating)
Feature section:
- 3-5 key features with icons
- Benefit-focused descriptions (not technical specs)
- Visual demonstrations (screenshots, GIFs)
Social proof:
- Customer testimonials highlighting specific results
- Case studies with quantifiable outcomes
- Company logos (clients or partners)
Objection handling:
- FAQ section addressing common concerns
- Comparison to competitors (handled diplomatically)
- Money-back guarantee or free trial offer
Webflow advantages:
- Interactions: Animate feature reveals, interactive demos
- CMS: Manage multiple products with templates
- Layout control: Precise control over information hierarchy
Comparison Tables
Help visitors understand your competitive advantages.
Table design in Webflow:
- Your product highlighted: Column with contrasting color
- Features vs. competitors: Clear checkmarks and X marks
- Benefit-focused labels: "24/7 Support" not "Support availability"
- Strategic ordering: Your advantages toward top
Implementation:
- Webflow's table element or custom-styled divs
- Responsive design (tables challenging on mobile—consider accordion alternative)
- Sticky header keeps column context visible
Interactive Demos and Calculators
Engagement increases conversion—interactive elements demonstrate value.
Interactive elements in Webflow:
ROI calculators:
- Input fields for user's current costs/metrics
- JavaScript calculates potential savings
- Results dynamically displayed
- CTA to discuss personalized results
Product configurators:
- Options for customization (features, tiers, quantities)
- Real-time price updates
- Visual preview of selections
Interactive demos:
- Webflow interactions simulate product experience
- Video walkthroughs with interactive hotspots
- Step-by-step guided tours
Technical implementation: Custom code embeds or JavaScript in Webflow; libraries like Alpine.js or Vue.js for advanced interactivity.
Lead Capture Optimization
Balance information access with lead generation.
Content gating strategies:
Ungated (awareness stage):
- Blog articles
- Basic guides
- Product overview pages
Soft gate (consideration stage):
- "Enter email to continue reading"
- Partial content visible, full version gated
- Case studies and whitepapers
Hard gate (decision stage):
- Pricing calculators
- Custom proposals
- Detailed technical documentation
Webflow gating implementation:
- Form required to access content
- Conditional visibility based on submission
- Thank-you page with download link
- Email sent with gated resource
Optimizing the Decision Stage
Reduce friction and build trust when visitors are ready to buy.
Pricing Page Best Practices
Pricing pages have highest conversion intent—optimize meticulously.
Layout and design:
Comparison table format:
- 2-4 pricing tiers displayed side-by-side
- Feature list with checkmarks showing tier availability
- Most popular tier highlighted visually
- Annual vs. monthly toggle
Visual hierarchy:
- Recommended plan larger/bolder than others
- Clear pricing display (large font, prominent)
- CTAs on each tier ("Start Free Trial," "Contact Sales")
Essential elements:
- Pricing clarity: No hidden fees, taxes shown separately
- Feature differentiation: Clear what each tier includes
- Trial offer: Free trial reduces risk ("No credit card required")
- FAQ section: Address pricing questions proactively
- Social proof: Testimonials from customers at each tier
Webflow implementation: CMS-powered pricing tables allow easy updates; interactions for toggle switches; custom code for calculators.
Checkout Flow Optimization
Minimize abandonment with streamlined checkout.
Webflow Ecommerce checkout:
Default optimizations:
- Mobile-responsive checkout
- Guest checkout option (don't force account creation)
- Multiple payment methods (credit card, Apple Pay, Google Pay)
- SSL encryption automatic
Optimization strategies:
Form fields:
- Minimum required fields only
- Autofill enabled
- Address validation (prevents shipping errors)
- Clear error messages
Progress indication:
- Multi-step checkout shows progress bar
- "You're almost done" messaging
- Edit previous steps easily
Trust signals:
- Security badges (SSL, payment processor logos)
- Money-back guarantee restated
- Customer support contact (chat, phone)
- Return policy linked
Cart abandonment reduction:
- Exit-intent popup with incentive (discount code)
- Email sequence reminding of abandoned cart
- Persistent cart (survives page refresh)
Trust Signals and Guarantees
Reduce purchase anxiety with credibility markers.
Types of trust signals:
Payment security:
- Stripe/PayPal badges
- SSL certificate indicator
- PCI compliance statement
Business legitimacy:
- Physical address and phone number
- About page with team photos
- Business registration/certifications
- Years in business
Customer satisfaction:
- Money-back guarantee (30/60/90 days)
- Free trial period
- Customer reviews and ratings
- Satisfaction statistics ("98% would recommend")
Webflow implementation: Trust badge components reused across checkout; dynamic testimonial display from CMS; guarantee details in prominent sections.
Measuring and Improving Funnel Performance
Track metrics to identify bottlenecks and optimization opportunities.
Analytics Setup
Essential tracking in Webflow:
Google Analytics 4:
- Track page views across funnel
- Conversion goals for each stage
- Event tracking (button clicks, form submissions, video plays)
- Enhanced ecommerce (revenue, products, transactions)
Setup process:
- Add GA4 tracking code to Webflow (Site Settings > Custom Code)
- Configure conversion events (form submissions, purchases)
- Set up funnels in GA4 (track stage progression)
- Enable ecommerce tracking for revenue data
Additional tools:
- Hotjar: Heatmaps and session recordings show user behavior
- Google Tag Manager: Manage multiple tracking scripts
- Facebook Pixel: Track ad campaign conversions
- LinkedIn Insight Tag: B2B conversion tracking
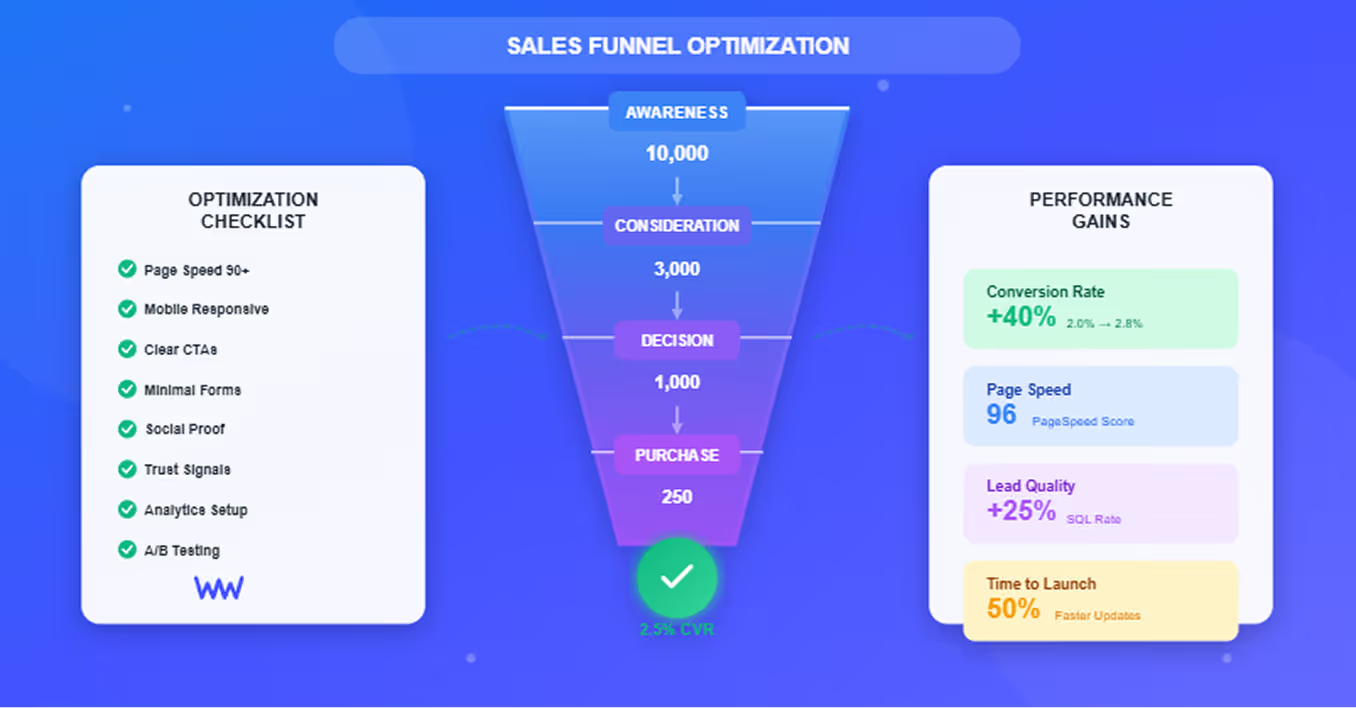
Key Metrics to Track
Funnel-stage metrics:
Awareness stage:
- Traffic sources (organic, paid, referral, direct)
- Bounce rate (% leaving after one page)
- Pages per session (engagement depth)
- Time on page (content resonance)
Consideration stage:
- Lead conversion rate (visitor → lead)
- Form completion rate
- Content downloads
- Email signups
Decision stage:
- Demo/trial signup rate
- Purchase conversion rate
- Average order value
- Cart abandonment rate
Retention stage:
- Customer churn rate
- Repeat purchase rate
- Customer lifetime value
- Net Promoter Score
Benchmarks:
- Landing page conversion: 2-5% typical, 10%+ excellent
- Pricing page conversion: 5-15% typical
- Checkout completion: 60-80% typical
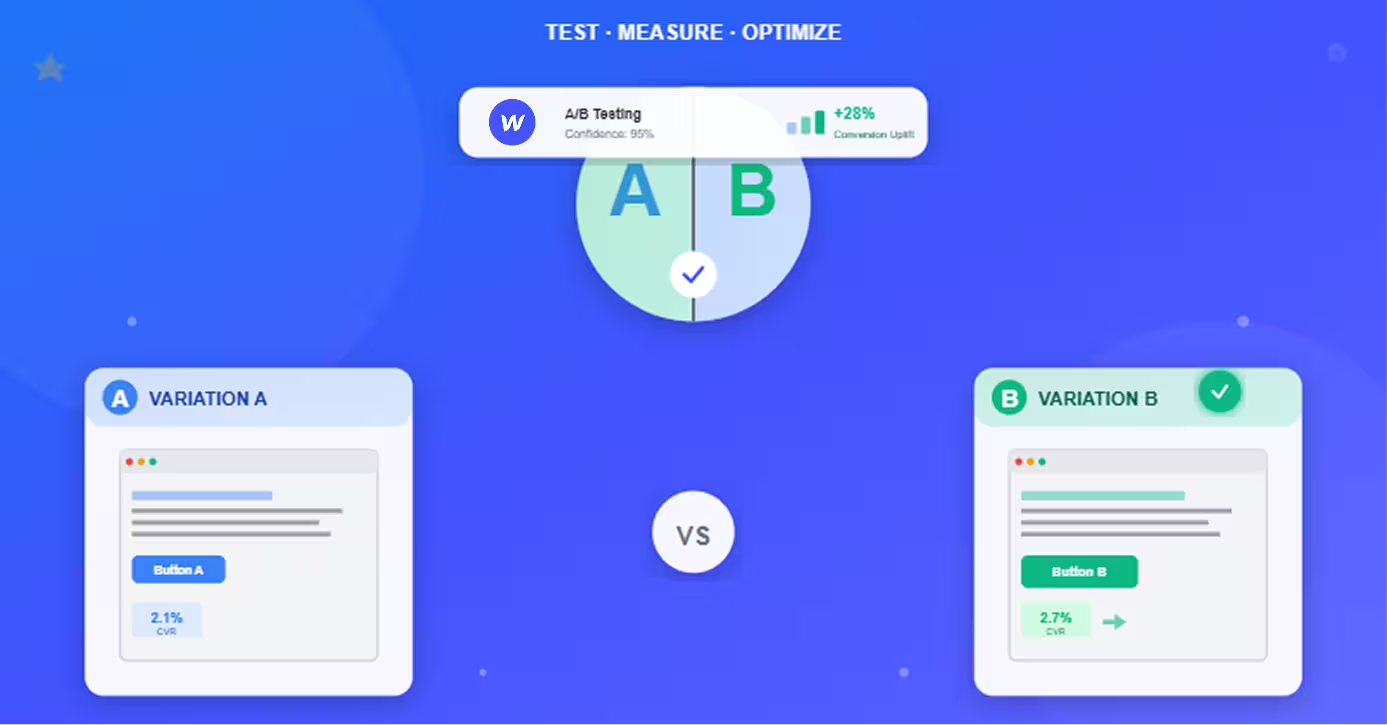
Conversion Rate Optimization
Systematic improvement process:
1. Identify bottlenecks:
- Funnel visualization in Google Analytics
- Find stage with highest drop-off
- Review heatmaps and recordings for that stage
2. Form hypothesis:
- "CTA on product page is unclear" (hypothesis)
- "Changing CTA text from 'Learn More' to 'Start Free Trial' will increase clicks 20%"
3. Implement test:
- A/B test proposed change
- Use VWO, Google Optimize, or Optimizely
- Run until statistically significant
4. Analyze results:
- Winning variation = implement
- Losing variation = form new hypothesis
- Inconclusive = extend test or try different approach
5. Document learnings:
- What worked, what didn't, why
- Build organizational testing knowledge
- Inform future optimization efforts
Continuous Improvement
Build optimization into workflow:
Monthly optimization routine:
- Week 1: Review funnel analytics, identify problem areas
- Week 2: Design and launch A/B test
- Week 3-4: Monitor test, begin planning next test
- Week 5: Implement winner, document learnings
Quarterly funnel audit:
- Review all stages for outdated content
- Update testimonials and case studies
- Refresh CTAs based on testing learnings
- Check all forms and integrations functional
Prioritization framework:
- High traffic × low conversion = high priority
- Low traffic × high conversion = maintain
- High traffic × high conversion = minor tweaks
- Low traffic × low conversion = revisit strategy
Conclusion
Webflow provides the foundation for high-converting sales funnels through performance, design flexibility, and unified platform advantages.
The framework:
1. Map funnel stages to Webflow pages:
- Awareness: Blog, landing pages
- Consideration: Product pages, gated content
- Decision: Pricing, checkout
- Retention: Customer portal, resources
2. Optimize each stage:
- Speed (90+ PageSpeed scores)
- Mobile experience (60%+ traffic)
- Clear value propositions (3-5 second clarity test)
- Strategic CTAs (action-oriented, prominent)
- Form minimization (each field = friction)
3. Measure and improve:
- Analytics setup (GA4, Hotjar)
- Key metrics tracked (conversion at each stage)
- A/B testing program (2-4 tests/month)
- Continuous refinement (monthly reviews)
The advantage: While competitors wrestle with disconnected tools, slow page speeds, and developer dependencies, Webflow funnels offer unified branding, exceptional performance, and marketing team autonomy.
Results: Clients implementing these strategies typically see:
- 15-40% conversion rate improvement (90 days)
- 50%+ reduction in time to launch funnel updates
- 2-3× faster page loads vs. previous platforms
- 20-30% higher customer satisfaction scores
Getting started roadmap:
- Week 1: Audit current funnel, map to Webflow pages
- Month 1: Build awareness and consideration stages
- Month 2: Implement decision stage (pricing, checkout)
- Month 3: Launch analytics and begin optimization
- Months 4-6: Test, measure, improve systematically
Build your high-converting funnel in Webflow—capture more leads, close more sales, and grow revenue without the technical headaches.
Frequently Asked Questions
Can Webflow handle complex sales funnels with multiple products and customer segments?
Yes—Webflow CMS and design flexibility support sophisticated multi-product, multi-segment funnels.
How Webflow scales for complex funnels:
Multiple products:
- CMS Collections: Create "Products" collection with templates
- Each product gets dedicated landing page automatically
- Category-based filtering and navigation
- Dynamic content displays related products
- Scales to hundreds of products efficiently
Customer segmentation:
- URL parameters: Direct different segments to customized versions (
/landing?segment=enterprise) - Conditional visibility: Show different content based on CMS fields or custom code
- A/B testing tools: Serve different experiences to different audiences
- Dynamic landing pages: Generate pages for each segment automatically
Complex funnel example (B2B SaaS with 3 tiers, 4 industries):
Structure:
- Industry-specific landing pages (4 pages from template)
- Product comparison pages per industry
- Tier-specific pricing pages (3 variations)
- Custom demo flows by tier
- Segmented email nurture sequences (via integrations)
Implementation:
- Base templates for consistency
- CMS collections for industry content
- Webflow interactions for personalization
- Form logic routes leads appropriately
- Integrations connect to CRM (HubSpot, Salesforce)
Real example:Agency builds funnel with:
- 50+ landing pages (templates + CMS)
- 20 product pages (CMS-driven)
- 5 customer segment paths
- Dynamic content based on referral source
- Manages entirely through Webflow CMS (no developers)
Performance at scale:
- Webflow handles 10,000+ CMS items
- Page load speeds remain fast (CDN, caching)
- Editing one template updates all instances
- No database optimization needed
When Webflow limitations appear:
- Very complex logic: 50+ conditional rules might need custom database
- Heavy calculations: ROI calculators with extensive math better served by external app
- Realtime personalization: 1:1 dynamic content at scale needs specialized tools (Mutiny, etc.)
For 90% of businesses: Webflow's CMS and design capabilities handle funnel complexity while maintaining performance and ease of management.
How do I integrate my existing marketing tools with Webflow funnels?
Webflow integrates with most marketing tools through native connections, Zapier, or custom code.
Integration methods:
1. Native integrations (easiest):
Email marketing:
- Mailchimp (native Webflow integration)
- HubSpot (via native HubSpot embed)
- ConvertKit (form embeds)
Setup: Connect account in Webflow integrations settings; forms automatically sync to email lists.
2. Zapier integrations (no-code automation):
Popular Zaps for funnels:
- Webflow form submission → Add to CRM (Salesforce, Pipedrive)
- Webflow form submission → Create task in project manager (Asana, Trello)
- Webflow ecommerce purchase → Add to email sequence (ActiveCampaign)
- Webflow form submission → Notify team in Slack
Setup:
- Create Zapier account
- Connect Webflow as trigger
- Connect target tool as action
- Map form fields to tool fields
- Test and activate
3. Custom code integrations (advanced):
Analytics and tracking:
- Google Analytics, Facebook Pixel, LinkedIn Insight Tag
- Add tracking code to Webflow Custom Code (
<head>or before</body>) - Configure events and conversions in respective platforms
Chat and support:
- Intercom, Drift, Help Scout
- Add widget code to Webflow
- Customize appearance via tool settings
Payment processors (beyond Stripe):
- PayPal, Authorize.net, Square
- Embed payment forms via iframes or JavaScript
- Handle checkout on external page or embedded
CRM integrations:
- Salesforce, HubSpot, Pipedrive
- Use tool's JavaScript API
- Capture form data, send to CRM via API
- Requires custom code knowledge or developer
Integration best practices:
Performance:
- Limit external scripts (each slows page)
- Load non-critical scripts asynchronously
- Test page speed after adding integrations
Testing:
- Submit test forms/purchases
- Verify data arrives in target tool
- Check all fields mapping correctly
- Test error handling
Privacy compliance:
- Cookie consent for tracking scripts (GDPR)
- Privacy policy discloses integrations
- User can opt-out of tracking
Common integration stack (typical B2B):
- Forms → HubSpot (CRM and email marketing)
- Analytics → Google Analytics
- Chat → Intercom
- Calendar → Calendly (embedded)
- Payments → Stripe (Webflow Ecommerce)
Webflow Marketplace: Browse pre-built integrations and cloneable templates with integrations configured.
What's better for sales funnels: Webflow or dedicated funnel builders like ClickFunnels?
Webflow better for most businesses prioritizing performance, design quality, and long-term flexibility; ClickFunnels better for quick temporary funnels and split-testing at scale.
Direct comparison:
Webflow strengths:
- Performance: 90-100 PageSpeed scores vs. ClickFunnels 40-60
- Design freedom: Complete control vs. template constraints
- Branding: Professional, custom designs vs. "funnel builder" look
- SEO: Clean code, fast speeds, proper structure vs. poor SEO
- Long-term platform: Full website + funnel vs. funnel-only
- Learning curve: Designer-friendly vs. marketer-focused
ClickFunnels strengths:
- Speed to launch: Pre-built templates, faster initial setup
- Built-in A/B testing: Native split testing vs. Webflow needs third-party
- Email automation: Included vs. Webflow needs integrations
- Funnel templates: Pre-built proven funnels vs. build from scratch
- Less technical: Simpler for non-designers
Performance comparison:
MetricWebflowClickFunnelsPageSpeed Score90-10040-60Load Time1-2s4-6sMobile FriendlyExcellentAcceptableSEO CapabilityExcellentPoorDesign FlexibilityCompleteLimited
Use cases:
Choose Webflow when:
- Performance and SEO matter (organic traffic important)
- Professional brand design required
- Long-term website platform (not just funnels)
- Team has design skills or resources
- Want full control over every element
Choose ClickFunnels when:
- Launching temporary campaign funnels quickly
- Need built-in email automation
- Running high-volume split tests (built-in tools)
- Team lacks design skills, wants templates
- Funnel-only approach (not full website)
Hybrid approach:
- Website and SEO content: Webflow (blog, main site, brand presence)
- Short-term campaigns: ClickFunnels (promotional funnels, product launches)
- Drive ClickFunnels traffic from Webflow content
- Best of both: performance + quick testing
Cost comparison:
- Webflow: $23-39/month site + $0-600/month tools (email, CRM, testing)
- ClickFunnels: $147-297/month (includes email, testing, but still need CRM)
Recommendation: Use Webflow for 90% of businesses—superior performance, SEO, and design quality outweigh ClickFunnels' convenience features. ClickFunnels makes sense for marketers running high-volume temporary campaigns who prioritize speed over quality.
How long does it take to build an optimized sales funnel in Webflow?
Timeline: 2-8 weeks depending on complexity, content readiness, and team resources.
Detailed timeline breakdown:
Simple funnel (2-3 weeks):
- Single product/service
- 3-5 pages (landing, product, pricing, contact)
- Basic CMS blog
- Standard integrations (analytics, email)
Week 1: Planning and design
- Funnel strategy mapping (1 day)
- Wireframing (1 day)
- Design mockups (2 days)
- Content writing (1 day)
Week 2: Build and integrate
- Webflow development (3 days)
- CMS setup (1 day)
- Integrations (forms, analytics) (1 day)
Week 3: Test and launch
- QA testing (mobile, forms, links) (2 days)
- Content review and editing (1 day)
- Soft launch and monitoring (2 days)
Medium funnel (4-6 weeks):
- Multiple products (3-5)
- 10-15 pages
- Content library (blog, resources)
- Advanced integrations (CRM, automation)
- Custom interactions and animations
Week 1-2: Strategy and design
- Funnel architecture (3 days)
- User research and personas (2 days)
- Wireframes for all pages (3 days)
- Visual design system (2 days)
Week 3-4: Development
- Homepage and key landing pages (5 days)
- CMS setup and templates (2 days)
- Product pages (3 days)
Week 5: Integration and content
- CRM and tool integrations (2 days)
- Content population (2 days)
- Interaction development (1 day)
Week 6: Testing and launch
- Comprehensive QA (3 days)
- Performance optimization (1 day)
- Launch and post-launch monitoring (1 day)
Complex funnel (6-8 weeks):
- Multi-product, multi-segment
- 20+ pages
- Extensive content (100+ blog posts)
- Custom calculators/tools
- Complex integrations (API connections)
Week 1-2: Strategy
- Detailed funnel mapping (5 days)
- Competitive analysis (2 days)
- Wireframes and user flows (3 days)
Week 3-4: Design
- Design system development (4 days)
- Template designs (3 days)
- Review and iteration (3 days)
Week 5-7: Development
- Core pages build (10 days)
- CMS and dynamic content (3 days)
- Custom functionality (calculators, etc.) (2 days)
Week 8: Testing and launch
- QA and bug fixes (3 days)
- Content review (1 day)
- Launch preparation (1 day)
Factors affecting timeline:
Speed up:
- Content ready upfront (biggest time saver)
- Clear strategy and requirements
- Cloneable template as starting point
- Experienced Webflow designer
- Simple design (fewer custom elements)
Slow down:
- Content writing during build
- Stakeholder review cycles
- Complex custom functionality
- Multiple integration requirements
- Extensive CMS content migration
Realistic expectations:
- DIY (learning Webflow): Add 50-100% to timelines
- Agency build: Quoted timelines generally accurate
- In-house designer: Similar to agency with fewer review delays
Quick-start option:
- Buy Webflow template ($50-300)
- Customize branding (1-2 days)
- Populate content (2-3 days)
- Configure integrations (1 day)
- Total: 1 week to working funnel
Post-launch optimization: Budget 5-10 hours/month for ongoing A/B testing, content updates, and conversion optimization.